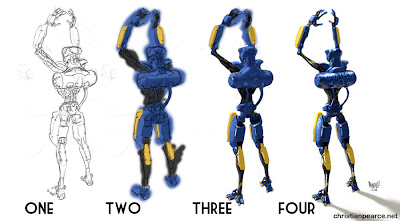
Here is a run-through of how this drawing happened.
Stage one is the pencil. Rough as guts and done in about 5 minutes. I love drawing stuff but it's rare that I spend much time on the pencils anymore. I'm always thinking about how much quicker and easier it will be to fix it in Photoshop than actually do the hard stuff in the real world. That's terrible advice! Spend more time drawing!
Stage two is after scanning it and opening photoshop. I keep my files pretty small so I can work quickly on 'em, usually the size they were drawn and at 300 dpi. A multiply layer over the top and very loose general colours and maybe first thoughts of how I want to light it.
Stage three is a new normal layer where I start trying to neaten it up. I work with opaque brushes from here, and dead simple ones they are too. I know people who do amazing things with custom brushes but I'm too dumb/lazy/old for much of that carry on. My main brush, and the only one I used for this piece, is a simple round soft brush with pressure controlling size and opacity.
Stage four I chucked a bit of text on there and bent it up with the warp tool. Put some shadows on there with another multiply layer and then a bit of dodge to finish, my secret shame...
There you go, what not to wear.

thanks I enjoyed this step by step!
ReplyDeleteCool! Thanks for that Christian
ReplyDeleteMore please! (fricking excellent thanks!)
ReplyDelete